Pages

Saturday, April 17, 2021

2021 Update

 It's been a looooong while, with Covid and all taking 2020 and shoving it down the toilet.

Thankfully, the family weathered 2020 well enough.  I also did manage to do a few things to the Alfa, like:

  • Replace the motor mounts
  • Fix a leaky VVT (it helps if you install an O ring seal)
  • Rebuilt the driveshaft and center bearing
  • Replaced the exhaust system
  • Rebuilt the front suspension
But those haven't been long jobs, though the front suspension was a bear after 35 years of neglect.

With the rebuilt suspension, Lola drives pretty well.  It's not 2021 standard ride quality, but not too bad.  It is a bit jouncy / reactive over bumps and I am not sure what to look into next.  She drives straight, stops straight (enough - brakes will eventually need doing), and runs quite well with good power.

My next task is to replace the transmission mount and start some cosmetic work, like pulling dents and dings and touching up the paint.

Read more »

Tuesday, December 17, 2019

Great Progress Continues

I haven't been diligent about posting to this blog, but I figured it was time to note something worthwhile.  I have pictures that I'll get around to posting some day.  I admit that I haven't been as diligent about taking those, either.

I've made enough in-flight missile repair progress to get Lola into shape as a semi-daily driver.  I have:
  • Changed the oil.
  • Fixed the glovebox door light to eliminate the drain that was killing the battery.
  • Sort-of fixed the rear view mirror, which was flopping between 'day' and 'night' modes.
  • Replaced the little clamp that holds the driver's side vent window shut.
  • Judicious use of wire keeps things inside together, but it's not perfect by any means.
  • Replaced the return fuel line, which cracked after 33 years of heat exposure.
  • Replaced the fuel filter and tested fuel pressure, which appears to be at the low end of the acceptable range. 
  • Revamped the cooling system with a new radiator (which I replaced with the original after being cleaned out--it fits better), new hoses and thermostat.  The thermostat was horribly clogged and probably sticking.  Lola now runs at a tick over 175, and I have heat with no leaks!
  • Got the A/C working with a simple recharge.
  • Fixed the aux cooling fan by fixing the power lead to the fan, which had melted away at some point.  I put a 20A inline fuse to protect it.  It works, both when A/C is engaged and when the fan shroud temp sensor trips.
  • Replaced the driver's seat bottom cushion.  I now sit much taller but the cushion is still pretty stiff (made for those small Italian posteriors).  I will have to give it time, or get a smaller butt.
  • Replaced the alternator voltage regulator and belt.
  • Replaced the lead from the alternator to the main power block with an 8 gauge wire.  I now have more amps as far as the gauge reads, but when I turn lots of stuff on at once I drop to the 10-11 volt range.  The alternator itself is probably going to get replaced at some point with a higher-amperage unit.
  • Cleaned and lubed the ignition switch after a harrowing moment where the car just quit running at 70, but came back with a sharp slap and a turn of the key.  So far, all is well.
  • Replaced all the ball joints in the steering assembly.  After taking her in for an alignment because tires were wearing badly, I was told there was too much slop to be able to 'take' an alignment.  After the replacement and a do-it-myself alignment, the steering was more accurate but still pulled to the right.
  • Replaced the castor arm joints.  The sides attached to the body weren't bad, but the sections attached to the axles were shot (like, moved a half inch in an out).  The replacement wasn't too difficult, and it got rid of a lot of noises except for the creaking when the passenger's side moved up and down.
  • Replaced the drop links for the anti-sway bar, which eliminated the creaking.
  • Replaced the tires, which had actually worn at a slant.  Lola now steers properly with no pull while coasting.  I measured my alignment settings for toe--and I am within spec, so I'll leave it alone for now.
  • Replaced the muffler, which fell apart at the pipe joint.
  • Fixed some rattles underneath the car.
  • Replaced the transmission and rear end fluids.  The trans fluid came out a horrible black and not enough, but pretty OK metal-wise.  The rear axle fluid was cleaner but there was more wear, which I expect is the friction plates in the limited slip diff.  They'll have to be replaced at some point.
  • Replaced the universal joint at the diff, which was binding and causing a shake at 45 and 70.  The shake is reduced but not eliminated at 45, but is gone at 70.  The giubo and front universal joint appear to be in good shape.
  • I tightened the driveshaft coupler, which reduced some rumbly noises.
  • I fixed the VVT solenoid mount, whose bushing had disintegrated.  (I didn't know what it was without some research--and I was surprised to find that this engine had VVT.)  I used Permatex black silicone gasket maker and set to what appeared to be the right height to dry.  So far, it holds tightly.

    Reinstalling it was originally disappointing--VVT didn't work when I tested it (the idle test) before installing the solenoid (which does work).  But a couple of days later, I accelerated in 5th gear and felt like there was something extra happening, and it was good.  So I retested VVT--and it's working!  The idle goes lumpy when I engage the VVT control pin.  I figure it had gotten clogged or stuck after not being used for a very long time, and freed up under repeated engagement.  I am super excited by this!
That is quite a bit of work to do part time on weekends while driving 2-3 times per week (200-300 miles per week).  But it means I can drive safely and in reasonable comfort.

The next set of problems to solve:
  1. Replace the radio, which is dying.  It is a cheap Insignia unit that is falling apart.  I realize that's not a high priority mechanical item--but I use that sucker two hours a day when I drive to work.
  2. Replace the lights in the instrument cluster--they mostly work if you slap the cluster around a bit.
  3. Drop the springs and wishbones, measure the springs (and replace if necessary), and replace the wishbone bushings and lower ball joints.  Replacing the bushings should remove the tendency to pull right on braking.  Replacing the springs might improve what seems to me to be significant brake dive.
  4. Examine the upper arm ball joint and bushing--I am hoping they're ok, especially the ball joint, since the arm was replaced with an adjustable unit at some point.  If not, I'll be doing some work there (I have the bushings, but not the ball joint).
  5. Check and repack/tighten the front wheel bearings, which I suspect will remove most of the remaining shake.
  6. Think about replacing trunnion bushings and things in the rear axle.  This work along with the wishbone revamp ought to remove the pull on acceleration and deceleration.  But man, this looks like a lot of work without a lift (which I don't have).
  7. Fix the passenger's side seat belt, which locks too quickly (you can't pull the belt out easily).  Then I can have passengers!
  8. Fix my driver's side high beam, which is either a broken wire or a problem in the switch.
  9. Shampoo and repair the carpet.
  10. Pull a bunch of dents and cut/polish the paint.
Stuff for the future:
  1. Replace the rear main oil seal and cigarette seals to cure that leak.
  2. When I do that, I have to drop the gearbox--so replace the clutch assembly, rear gearbox oil seal, and think about some minor refreshing of the gearbox proper.  Lola has the typical 2/3 gear crunchiness when shifting rapidly, but the gearbox itself is pretty quiet.
  3. Rebuild the differential a la "Wheeler Dealers" to tighten the diff.
  4. Replace the exhaust system, which is cobbled together and looks and sounds terrible (to me).  It does pass emissions testing, so I can live with it for a while.
  5. Probably replace the fuel pump.
  6. Do something about the dash, which has two ugly cracks.  I could probably repair these myself and resurface the panel with some nice vinyl.  It will also give me a chance to tighten up stuff that's gone somewhat floppy.
I'm pretty happy with how things are going, and Lola is more and more fun to drive as I bring systems back up to par.  She gets lots of looks and questions.  I haven't seen another older Spider in the Valley (yet), so it's neat to drive something uncommon.  And hey, she's Italian!

Read more »

Sunday, August 11, 2019

Shocking

It's been a while, but it's been hot... but I finally had a decent weekend to replace the front and rear shock absorbers.

Here's a pic of where I started at:


Things actually don't look horrible, even though lots of bushings need replacement.  The upper control arm has been replaced--notice the adjustable link?  And also notice that KYB Gas-a-Just shock.

But it's filthy.  So a quick clean later:


Ahhhhhh.  Not show quality, but at least I can see what's under that grunge.

Changing the front shock absorber is dead simple.  Unbolt it from the bottom and top and pull it off.  It turns out the shock was completely frozen--it wasn't just stiff, wouldn't budge.  That explains the wagon-cart-like ride.

I installed Koni adjustables from Classic Alfa.  The Koni's were only a couple of bucks more than the Bilsteins, and I can play with them.  I left them on full soft as recommended by a couple of sites I follow.


They came with neat stickers, too.

It took me longer to clean than to replace the front shocks.  I can't say that's the case for the rears...

To replace a rear shock, you have to:
  • Remove the carpet behind the seats to access the access panel
  • Remove the panel
  • Unbolt the upper shock mount (two 13mm bolts--I'm still not used to this metric stuff)
  • Unbolt the lower shock mount (one 17mm and one 19mm--the 17mm secures the 19mm)
  • Remove the shock through the upper access panel
It is not as simple as it sounds.  The rear shocks were original OEM Alfa parts--and having never been changed, you can guess how much fun it was to get those bottom bolts off.  I ended up using a vise grip on the shock to hold it in place while I turned the 17mm bolt off, which finally gave after much cursing.  The 19mm then came off easily--so the keeper nut was a good call.  The other side wasn't much easier, though it went faster.

Once out of the car, changing the upper shock mount is pretty simple.  Keeping the lower rubber bush on the pin was fun until I used a little masking tape.  (I installed SuperFlex bushings for the fronts and on the top rear shock mounts, but I couldn't compress them enough for the bottom nut to catch--so I went with the rubber bushing supplied with the shock.)

Installation is then the reverse of disassembly.

Did I mention it was 106F out?  Nice, but not exactly cool.

While I was there, I also replaced the retaining straps as the ones on the car were rotting away.


The new ones are rubber and a very strong cloth weave that should hold up for ages.

With all that done, the car rides a lot better, though clunks and thunks in the front suspension tell me there's lots more to do.  The steering is oddly light in the center of travel, though precise.  At least it doesn't wobble and shudder down the road any more.

I also replaced the rotting door seals so the car wouldn't whistle from air leaks around the doors as it went down the road.

Anyhow, I went for a drive to get takeout.


This will be a great car once it's sorted.

Read more »

Sunday, June 16, 2019

Turning Indications

One of the first problems I wanted to tackle was the turn signal indicator stalk that had broken off.  I didn't think I'd be able to repair it, so I went scouting for a new combination switch.  The switch has the lights, turn indicator, and wiper stalks as one unit.  It seems the turn signal stalk is prone to breakage for some reason--probably because people grab and turn it trying to turn on the lights (which you twist once to get parking lights, again for headlights, and pull down for high beams).  Let's call that an interesting design choice and move on.

You can buy these switches new for about $250.  But in keeping with the spirit of renovation, not restoration, I wanted to try to fix mine.  So I found a used combination switch on eBay for $64 shipped with a good turn signal stalk but a bad lights stalk.  I figured I'd make one good one out of two and be in the pink.

The first job was to remove the steering wheel.  The Alfa uses a key and not splines to hold the wheel in place, which makes it "fun" to remove after 30+ years of residence.  It's like trying to get your Millennial out of the house and into their own place.  The only hope is a steering wheel puller.  But first, you have to remove the horn assembly by unscrewing the four Phillips head screws, disconnecting the lead and removing it from the wheel.


There's that nut at the bottom of that well.  It's tougher than the nut behind the wheel.

Once the horn assembly's out of the way, on goes the puller.  The hub puller uses looong (like 125mm) M6 x 1.00 pitch threaded bolts for this car.  I didn't have those, so I made some out of threaded shafts, couplers and shorter bolts.


With a quick prayer, a bit of luck and enough persuasion, the wheel will come off.


Finally, find a way to remove the bottom half of the shroud around the switch.  The retaining posts on mine are broken in the back, so I could do this; otherwise, you're removing what seems like most of the dash to get that cowl off.  I didn't want to mess with it at the time, so I left the top half in place, which did make things more difficult.

Now, on to the second act.  I took my 'good used' turn signal switch apart.  The bottom one is the good one, of course, and the other parts are (in clockwise order) the cover, the canceler, the canceler base, the contact, and the spring and retainer.


Since I was only working on the turn indicator, this was possible to do in situ.  But here's how it goes together.  Note that the spring fits inside the stalk base, and the assembly rocks on the pin.  The canceler and stalk base have little teeth like a gear set; as the column rotates the canceler back after a turn, the stalk rotates in the opposite direction to a neutral position, with the spring providing the resistance to hold everything in place.  It's oddly elegant.


This is where the hard part came in and having the cowl in place made it harder.  You have to put the cover back on after fitting everything in place.  You get one shot; if things slip out (which of course they do since they're vertical and not on a flat bench, where this is hard enough to do) you start over and hope you didn't lose that little retainer on the spring.  The cowl was also right in the way of where the plate had to go, so it was even more fun.

But it can be done.  See?


The replaced stalk works great.


(By the way, that's my wife's old keychain from when she was a teenager.  How cool is that?)

I also resoldered a broken wire that controls the wiper auto-park feature, so now the switch is fully functional.  Not bad for $64, and I have parts for next time.

Button up the cowl, replace the wheel and horn assembly, and you're all set.  Not bad for a morning's work.

I spent the afternoon wiping down and vacuuming the interior.  The carpets are very dirty, but look salvageable with a good cleaning.  That means taking the seats (and maybe the center console) out to get the carpet out; I have to take them out and clean to get rid of that musty smell.  The leather seats are in great shape and cleaned up nicely.


What a difference a little TLC makes!

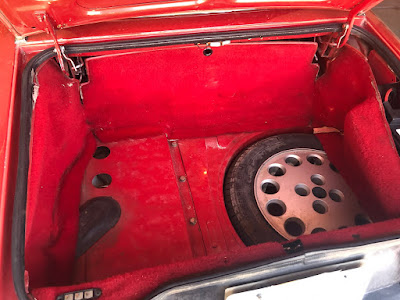
I looked at and cleaned the trunk carpet, too.  As you can see, the trunk floor is rust free and the original spare is in place (and flat).


I found some more parts that need repair and/or replacement--the third brake light and the assembly holding the rear license plate lights is badly damaged and poorly repaired.  I might be able to save it, though a decent used replacement would be better.
Read more »

Titles, Tags, and Tuneups

Friday was an interesting day.  And by "interesting", I mean "a total pain in the ass".

I went to AZDOT to get the title transferred over to my name.  No big deal, right?  I mean, you go, stand in line, get a number, go to the desk, and do the deed (as it were).

No.

I found out after standing in line for almost an hour that a car which requires an emissions test must have said test done prior to transfer of title.  Allegedly, if the prior owner has proof of this, then you can use that--but I didn't have that, and apparently the AZ DOT doesn't keep that information in their own computers.

I had checked online for the requirements and this wan't listed anywhere.  I asked, and it turns out the policy changed THAT WEEK and the website hadn't been updated yet.  Come on.  Someone didn't think this through--you publish something like that a couple of months before you do it.

I had two alternatives:

  1. Drive Lola to get an emissions test, then use that (failed or no) for the title transfer.  The only problem was, Lola isn't exactly roadworthy.
  2. Pay someone to come out to my house and do a "Level 1 inspection", which from my experience with Gidget meant "pay someone to look at the VIN and say it matched".  Or, drive it to the DOT office--but again, I wasn't too sure about that.
And did I mention it was 104 degrees out?  And Lola's A/C doesn't work?

Well, no way was I paying someone.  And I had a week to decide--or I'd get a penalty for not transferring title in 15 days.  What a racket.

I bit the bullet.  I got home, got Lola running (she does run and drive, just badly; how else did I get her home?) and drove to the emissions test facility.  It was an interesting drive.  The suspension is not what I would call 'sporty' right now, and it was hot.  I did learn that the top's rear window zips out--nice!

I guess I picked a good time of day, or got lucky--in 5 minutes I was in the bay and getting tested the old fashioned way.


I told the tester that I didn't expect to pass, but I needed to get a record of it so I could transfer title.  He was really nice.  He ran the test.  He inspected the engine.  He took my money.  And he gave me this.


HOLY S**T!

That was totally unexpected.  All I had done was change plugs.  Wow.

So I trundled back over to the DOT office, waited in line for another half hour, presented my emissions form, and got a number to go stand in line for another half hour, at which point I finally got the title transferred and a plate (two years; I'm taking advantage of this test).  I got a customized plate--but it's a surprise.

 Again, wow.  Lola is legally mine and legal to drive.

On to the tuneup part of this episode!

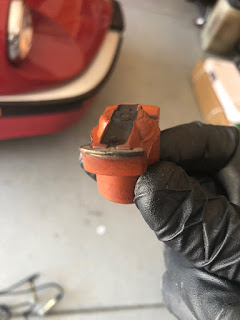
The first thing I did was change the cap, rotor, plugs, and wires.  I had put a used set of plugs from Gidget in Lola to get her running better, but I bought a new set, so in they went.  It turns out my car has electronic computer-controlled ignition, because there ain't no points on that distributor.


Look at that rotor and cap.  Ugh.

So in went new parts, and there's more zip now than before.  And the red wires look nice.


There's still some problems to sort out, and now they have to be fuel-related.  Lola is hard starting without pumping the pedal a couple of times, and while there's grunt at idle there isn't a lot of top end.  I did determine that the speedo reads low by 5MPH, so that helps a bit. 😀 I know the fuel filter needs changing, possibly the fuel pressure regulator, maybe the injectors, and I hope it's not the fuel pumps (one in the tank as a booster, and one main pump).
Read more »

Sunday, June 9, 2019

Inspection

It's time to look at this car and see what's good and what's less good about it, at least mechanically.  And maybe do a little bit of something.

First, let's look under the hood.  (I'm pretty sure Italian cars have hoods, not bonnets.)


Dirty and oily.  Break out the degreaser!


Better.  Not super, but better.

I also discovered that after the bath, Lola didn't want to run very well.  I suspected bad wires and cap--and both are toast.  I can hear the arcing in the cap and feel spark through the top terminal on at least one wire (shocking!).

I also decided to pull the plugs and see what I had to work with... I suspect that these plugs had not been out of the engine in years, if ever.  Look at these.


Turrible.  For grins, I checked the gap--the correct gap is .025", and these are sitting at about .040".  I can't believe they'd spark at all.

So I installed a set of BP6ES plugs from the MG (the Alfa takes BP7ES, but good enough for now) and she runs much better aside from the aforementioned arcing.

I've got a full tuneup on order--cap, rotor, plugs, wires, points and condenser.  Yep, still points.  That's OK.  Points work great.

On to the rest of the car--here's pics of what I found after a thorough degreasing (though there's more to do to clean things up all the way).


To sum up:
  • The engine runs like crap compared to how it should run.  It needs a serious tuneup.  And there are leaks, which I'll find now that it's clean.
  • The cooling system isn't great.  The radiator's been patched with what looks like epoxy around the filler.  WTF?  The water pump may be making noise, but it will get replaced as a matter of course.
  • The A/C is hooked up but doesn't work.
  • The front suspension isn't horrible, but a rebuild is definitely in order.  All of the ball joints and bushings need replacement.  The front shocks are cheapo replacements and need to go too.
  • The steering is actually ok aside from new ball joints.  I'm much less concerned about that aspect now and I think the funny behavior will clear up with the rebuild.
  • The brakes need rebuilding--calipers and rotors/pads.
  • The exhaust system will eventually have to be replaced, but works for now.
  • There are some leaks under the car--at least one is the transmission rear oil seal.
  • The driveshaft donut and universal joints need replacement.  The center bearing is OK but may get replaced anyhow.
  • The rear axle has some leaks somewhere and there's way too much play in the pinion.  A rebuild is probably in order--and I'll add friction discs to the rear diff just like I saw on "Wheeler Dealers" to improve the LSD's action.
  • The rear suspension is as bad as the front--it needs all new bushings and shocks.  The shocks are original Alfa Romeo--so they're either OEM replacement or original to the car.
For all of that, it's not that bad.  The big stuff is really the big stuff (suspension, brakes, cooling).  The rest can be dealt with a piece at a time.  The leaks can be lived with for a while.  The A/C would be nice, but it's not essential.  Actually the only other thing I have found that doesn't work so far are the dash lights and one power mirror. (EDIT: The lights work; the switch needs cleaning.)

This will be fun.
Read more »

Saturday, June 1, 2019

Taking the Plunge

I had a problem.  (Note: "Had".)

My previous project ("Gidget", my 1965 MG Midget) is done.  (Well, "done" is relative, but the restoration's over.)  While I love working on Gidget, I've been getting the itch to do something else... but not at the level of effort that it took to do a bare-metal restoration.  I want a daily driver that has a decent body but needed mechanical and/or interior work.  In other words, something I can drive and make better along the way.

A larger part of the problem was getting my wife, who had just suffered for six (six!) years with the Midget, to buy in.  It needed to be the right car, at the right price, with the conditions I just stated above.  In other words, she needed to like it.

So... her dad has a friend, who had been talking about his Alfa Romeo.  He said he drove it, and it was in decent shape.  I was interested.  However, he never quite got to the point of parting with it.  That was enough to keep it out of sight and out of mind... until one day.

The tipping point was twofold:
  1. My daily driver ("Nigel", a 2011 Mini Cooper S) needed $2300 of work to take care of age-related problems.  This spurred interest in finding something I could drive a couple of days a week to keep the miles down.  (I've wanted an MGB-GT, but that wasn't happening... apparently, it isn't the right car.)
  2. The dad's friend started talking about trading it in while they moved houses.  If he was going to trade it in, well, why not sell it?
That week I took a ride over to the dad's friend's house (Tony and Filomena) to check out the car.  It's a 1986 Alfa Romeo Spider Quadrifoglio.  Basically, this is a fully loaded Series 3 Alfa Spider with fuel injection, power windows and grey-on-red interior.

My impressions were:
  • It looked nice.  The body had been repainted, but was straight and rust free with some trim and mirrors needing attention.
  • The interior was not great.  Most stuff worked, but it looked kind of shabby and it had definitely been sitting closed up for a while.
  • The A/C (yes, a mid-80s convertible with A/C) didn't work.
  • The engine ran, but there was a definite lack of zip.
  • Cooling and charging were 'ok'.  It ran a little hot, and the alternator was barely keeping up.
  • There was lots of oil coating the underside, and a definite leak from somewhere.
  • Brakes and steering and suspension were not too great, but they worked.
  • It had a nearly new soft top.  The hard top was long done (which was a big selling point for the Quadrifoglio).
  • Top-down driving was awesome.  Top-up driving was not bad either.
Amazingly, this car met all my criteria, and being Italian it had Julia's interest, too.

I did some research and I figured I was looking at a couple thousand in repairs (mostly suspension), which wasn't great, but manageable.  The price was right for the car's condition.  All the pieces fell in place, and by the end of the weekend I had the keys and title in my hand.

Without further ado... allow me to introduce you to "Lola" (named somewhat after Gina Lollobrigida).


Isn't she pretty?

This blog will be about the revival of Lola the Alfa Romeo to a daily-driver condition.  ("Rianimare un'Alfa" means "Reviving an Alfa".)  It's not a restoration or a concours-level presentation; it's getting her back on the road reliably and safely.  I'm sure there will be some little "improvements" along the way, but the focus is on usability, not show quality work.

I can't wait to get started!
Read more »